3 - D Viewing Instructions
Here I
have provided detailed instructions for the viewing of my 3-D images on my web
site.
Click
here to go Back to Main 3D Page
Click
here for 3-D Imaging Information Page
Or don't click anything to continue.....
Now this may seem a little difficult or confusing at first, but trust me, its
actually very simple and easy, once you get the hang of it.
Basically its just a matter of slightly crossing your eyes to connect the two
images together. The new, combined image in the center is the 3-D view.
But if that still doesn't work, here is a more detailed description;
Crossing your eyes:
How do you cross your eyes? Well, some people have actually told me
they don't know how to cross their eyes. But I thought that this was something
that we all have done when we were kids. Especially when your mother yells at
you. Okay, maybe that was just me. Hmm, so a guess a little more description is
needed here.
I guess one of the most simple ways to get you to cross your eyes is to try to
look at the end of your nose. Or try putting your finger really close, right in
front of your face. Look at it, move it in closer until it is directly in front
of and between your eyes. You should not be able to see it clearly as our eyes
are not suppose to be able to focus that closely. But as you have it there, and
looking at it, your eyes should be crossed. Try to get use to this feeling. It
will probably be somewhat uncomfortable and there will be a strain on your eye
muscles. Don't worry, as long as you don't do this for long periods of time, it
shouldn't be hazardous to your vision. And don't worry, you will never need to
cross your eyes anywhere near this extent to view my images. But practice
crossing your eyes so that it becomes more comfortable.
Now let's experiment a little.
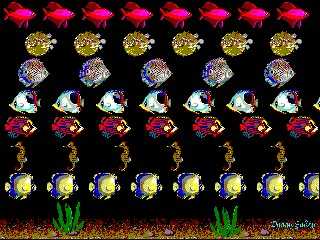
Now, as you practice crossing your eyes, take a look at the image above. Look very carefully at the fish in the image. Now try crossing your eyes very slightly to try top match any of the fish up together. In doing this you must try to keep your head and your eyes as level as possible. You might even notice that the fish might not be level as you look at them. You might have to try tilting your head slightly from one side to the other. But as two fish connect, keep focusing on them. In this image you might have actually connected fish from a lot wider apart than is necessary, meaning that you crossed your eyes even further. In this example, it doesn't really matter. So, after keeping your focus on a specific fish, try to relax your vision a little and get use to the feeling. Now try to slowly expand your focus to a different row of fish. The different rows of fish should now appear to be at different distances. But don't worry about those alienated fish on the sides of the image.
Now, take a look at the two "D" 's below. Do the same thing. Slightly cross your eyes and try to match and align the two "D" 's together as one. You should now actually see three of them, with the center one being more solid than the two on the outsides. Sorry for the pun, but you should now see 3 D's.
D D
If this worked, then try the two images below, using the same principle.


If you were able to see that the rose is closer and everything else is further away, then you are ready and you should be able to view the rest of the images on the other pages. Go explore and have fun.
If you are still not able to see the effect then feel free to email me and we can try to work it out together.
Have fun.
Click on the following link to go to the main 3-D page:
3-D Images
Or click this link for details about 3-D
images:
3D Imaging